One-of-a-kind furniture and home decor!

You can reach me at 435-862-0908 or email sharleyfunk@msn.com.

Ready for some COLOR?


 The Challenge:  Make this cedar chest...
look like this candlestick.  All righty then!

Ready to see me make a big, HUGE mess with someone's special Lane cedar chest?  Then continue reading.

Step # 1:  Add some texture.  I watered down some spackling and used a paint brush to apply it in all different directions and super messy.  I did about 3 coats of this. 

Step #2:  Add some layers of color.  I sprayed orange and then used a dry brush and just wiped bits of color over the orange.  It looks like someone's faux painting nightmare doesn't it? 

Step # 3:  Spray a fine mist of red over the whole mess.  But, wait!  It gets worse!!!
 Step #4:  Use a putty knife to scrape off some of the texture. 


 Step #5:  Using 100 grit sandpaper, sand it by hand so the colors will come through. 
 Step #6:  Use a paint brush to wipe glaze all over, making sure to get into the grooves of the texture.  And then of course wipe off the excess glaze. :)

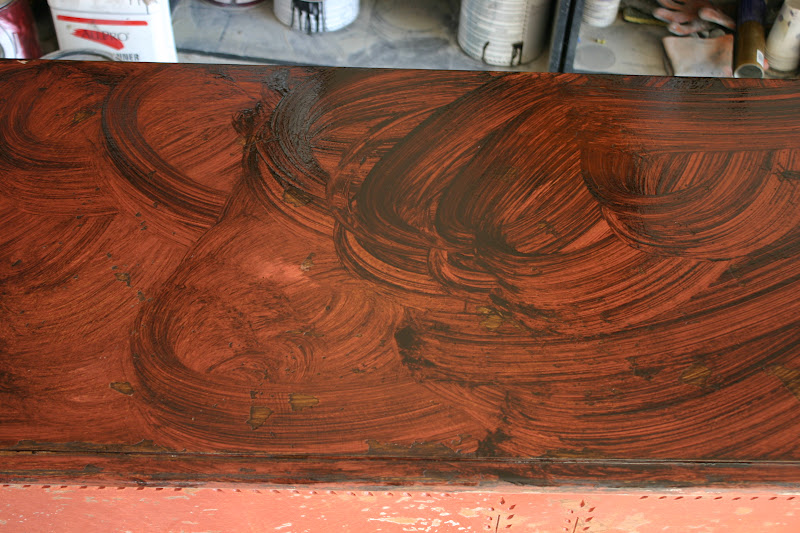
Seriously how scared are you right now?  I kept thinking "Good thing I know how to strip furniture".  Ha ha

So after sealing it here is the final product...drumroll please...


 And the inspirational candlestick.  It turned out pretty close. 

My favorite part of the refinish:  I asked my client if she wanted to add any moulding to the bottom or have me putty the designs on the front and she said she didn't want to change it too much since it was a graduation gift from her mom.  :) Ha ha  Hopefully her mom feels like she didn't change it "too much". 

Chippy Paint "How To"

Ever wonder how to get that amazing chipped paint look?  I did for a long time and I think I finally have it figured out.  A putty knife!  That's the secret ingredient!
After painting just scrape the paint with a putty knife.  It will just kind of do it's own thing.  Don't try to force it.  I usually scrape along the edges and then just run it across the paint.  It's really fun to see it taking shape. 

 The front of this "potting bench in the making" will have three of these drawer fronts with a sink in the middle section. 
 Here's something VERY IMPORTANT to remember.  It's kind of a "duh" but sometimes I don't figure out those obvious parts of the refinish until I've wasted a lot of time, so I'm just going to tell you in case you're anything like me.  The original paint color or colors will show when you scrape it.  Ha ha, I know. 

Since I was painting a cream color, I applied dark walnut stain before painting.  I wanted the dark stuff to show through,  AND the paint probably wouldn't scrape off if applied directly to raw wood. 

So here are the steps:
     1.  Stain raw wood
     2.  Apply Base Color
     3.  Scrape with putty knife
     4.  Glaze if desired
     5.  Seal the piece with your product of choice  :)

Happy Chipping!


Antique Dresser gets a makeover

My client scored this piece at a yard sale and I don't even want to talk about the amazing deal she got on it.  She seriously has a gift.  It's like beautiful pieces of furniture are just calling to her, "Come get me!  I'm almost free!"

Doesn't it look like it's missing something in the middle?  And the knobs seem to be running away they're so far out there.


 Using this technique I added a design to the center for a little extra something. In the smallish town of St. George, Utah there aren't a lot of options for stencils so I just printed a design I found from google and cut it out with an exacto knife.  It only took about 30 minutes to actually make the stencil but I spend a whole day trying to find just the right one.  :)  I would suggest skipping this step.  Ha ha 
So, here's the end result! 
 We're saving the cute antique knobs for a future project and replaced them with some bigger, swirly handles.  It seems a little more balanced now. 


Linked to Primitive and Proper

New Hutch!

I'm so excited about this hutch I can hardly breath!  Or maybe I've just had too much Diet Coke today.  Yeah, that's probably it.  :)

I've been doing so many custom orders (which I love) but it was nice to just do whatever I wanted this time.  I LOVE how it turned out. 
I wish, wish, wish, I had a bunch of bright turquiose dishes or orange or something.  Wouldn't some bright colored stuff look so fantastic in this hutch? 


 This beauty is FOR SALE!!! $375
Here's the blah before...
Linked to

Spiffied up Thrift Store Shelves

Shelves are something I have a hard time passing up at the thrift store.  Shelves and chairs.  They're just irresistible to me! I thought I'd show a few "Before" and "After" pictures of some shelf makeovers. 

Here's the back side of a shelf I covered with bead board.  You know the heart shelves that we all love...


And here it is after!

To improve this next shelf, I just added bead board and puttied a few holes.


 This next one just needed some paint and bead board. 


 Don't overlook those ugly shelves at the thrift store!  It's amazing what a little paint & bead board will do!

It's a Shame to Paint it But I Can't Help Myself!

I bought this "oh so beautiful" armoire for my own house.  I paid way too much for it on craigslist but when it's true love what can you do?   


It was a real dilema for me.  I loved the 2 tone and the beautiful rich wood, but I thought I might like it even better in white.  So it sat in my garage for about 6 months while I debated about what to do.  Yesterday I finally got brave!


 I LOVE it and don't regret painting it one bit!  It looks amazing in its new home!

Linked to

New Doors for Lexi

This is a gorgeous armoire by Lexington that didn't need to be refinished.  It was in perfect condition except for one tiny thing.  The doors had warped while being stored in our extremely hot and dry climate.  They wouldn't close which kind of defeats the purpose of an armoire, right?

Just so you know, most of the stuff I do, I'm totally winging it.  I take care of one issue at a time and never know how I'm going to end up with a finished project but it always seems to work out with a little time and patience.  I really wish I could be a carpenter's apprentice for a while. 

So I went to Habitat Restore and found some doors that were close in size.  I cut them down and removed the moulding from the old doors, added that, and then a smaller piece of moulding to the inside.  Here's what the doors looked like when I finished...


And here is the final product...


And it's for sale!  $450